Wednesday, December 30, 2015

My 2015 Year in Review


2015 year has been something, alright!

I'm not ashamed to admit that the first half was pretty heavy and depressing for me, as I was still reeling over the loss of one of my dear friends, Kevin Kanai Griffith. :(

I felt like in early 2015 it had to really force myself to do personal writing (and I did), but the art side of things wasn't coming nearly as easily for me, and somewhere in late 2014 and early 2015 I felt like someone had shaken me awake to get me to really sit down and think if I was happy with the trajectory of my career as a Community Manager at Blizzard. In truth, I was content and I certainly enjoyed a lot of the work I was doing, but I kept finding myself wondering if I was selling myself short by not even letting myself consider the possibility of a more creative career in the arts.

The thought was terrifying, and then after a time, it was inspiring. What could my life be like in another five or ten years if I let myself pursue the arts? Would I even be capable, qualified, or skilled enough to change careers and find success in something so different? Would I have to leave Blizzard to progress?

In the early half of 2015, I didn't talk about it, but behind the scenes, I gave it my all.

I applied to a job at Blizzard as a Media Artist within Story and Franchise Development (formerly known as Cinematics) and Video and Post Production with every ounce of passion I had. I spent countless hours on my cover letter, resume, portfolio, and then threw myself into the art test and preparing for the eventual interview.

And I got it.

And I haven't looked back.

I talked about my new opportunities within Blizzard in this blog post, but even in the time since, I've got to tell you: I am so much happier. I have so much more creative energy both during and after work, and feel like I am just buzzing with ideas. I feel like myself again, in the best possible way. I love being surrounded by so many creative individuals, I am digging my new work/life balance, and I am so excited for where the future will take me. I'm glad I dared to make the change, and that I had the opportunity to join such an immensely talented, passionate, and wonderful team.

So when I look back at the first half of this year, part of me cringes that there isn't a lot to show for it publicly, but man, if you could see all the hours and hours that went into my portfolio/art test, you would probably understand that that's completely fine by me. :)

I remember about a year ago at this time I was really struggling with whether or not to make a career change, and I'm immensely glad I did. If I had any piece of advice in all of this, it's to be willing to believe in yourself and pursue your own happiness with as much gusto as you can muster! It's never too late to follow your heart!


12 Glimpses of My 2015 Year in Review


This year was extremely busy, but I put together 12 of my "top" projects throughout the year, which you can see above and learn more about below:
  1. World’s First Butterfly Cosplay – Part 3: Bringing Monarch Brightwing to Life: While I technically completed this official project in the middle of 2014, it wasn't actually posted publicly until May of 2015. It was definitely a fun project to try to realize Monarch Brightwing in a butterfly-cosplay-sized sculpture, but I really enjoyed the challenge! It was one of the first full-body sculptures I'd done in years, too!
     
  2. This year I did a fair bit of personal writing, organizing, blogging, and a boatload of social media. I made 16 blogs in 2015, including numerous blogs detailing walkthroughs of my various projects. I'm hoping to increase that number in 2016, as well as to really kick my writing into gear!
     
  3. This is one of the many composite images I created for my portfolio for my media artist job application. I spent so much time working on the contents of it, and I'm so very glad it all paid off. :)
     
  4. Matt Murdock (Daredevil): Avocado at Law: I got really into Netflix's Daredevil this year, and allowed myself a bit of a breather to do some loose fan art of him in the middle of the year.
     
  5. 30 Day Story-Sketch Challenge: Day 2: Protection: In July I decided to challenge myself to partake in a 30-day challenge to sketch characters and environments from a story I wrote, and would like to get back to editing in order prompt me to get back in the headspace of those characters. This is the second day's image of two of the main characters. Unfortunately I only made it about five days in before I got really sick and put the challenge on ice for awhile, but I definitely plan to give it another go next year.
     
  6. 'Butterscotch' - World of Warcraft Fan Art Yak: Gah, this project was a beast! Started on November 3rd, 2012 and completed on July 26, 2015, this project spanned many years, and was subject to so much scope creep and technical hurdles that it was sometimes incredibly frustrating to keep moving forward with it, but finally, finally it is done. During the last two years, I've been trying to finish off a number of long outstanding projects and this was one of them. It was also a more than subtle reminder that money and time are hardly limitless, so it's important to make sure you're spending your time on projects you find worthwhile, and well, that you actually finish them.
     
  7. “Dragon Mage” – ZBrush Sculpture: This is yet another project that had been put on ice for awhile that I finished up in 2015. I had a lot of fun with the patterning on this fella. :)
     
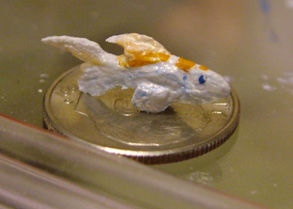
  8. Sculpture: "Friendship": Amidst a lot of really time-intensive projects (like the job application, Monarch Brightwing Sculpture, and Yak project), when Cindy visited me this year I was somewhat emphatic that I wanted to to a project we could actually complete during a few days, and this ended up being just that. :) I'd long wanted to experiment with a particular type of air dry clay, and had a wonderful time sculpting with my seester! <3
     
  9. Demon Pig from 2015 BlizzCon Sketch Group: I enjoyed working at the BlizzCon Art Gallery this year as well as at the BlizzCon Sketch Group. The theme for the sketch group was "demon + pig" so I had fun with it. :)
     
  10. Crafty Secret Santa and "Sailor Usagi": This year I hosted a special Secret Santa-type exchange for crafty people that you can read about here, and by and large I feel it's been a great success! My own giftee enjoyed (among other things) Sailor Moon and rabbits, so I forged her interests together into a fun little sculpture gift. It was a lot of fun to be able to allow my creativity to go wild on another short-form sculpture!
     
  11. Jeweled Lion Sculpture (Work in Progress): While it's not done yet, in late December I discovered yet another abandoned project from many years ago (2011), and I decided to take a break from my other projects to try to and make it into something with a bit better form. I'm looking forward to finishing it off!
     
  12. “Sashah's Song” – Mixed Media Sculpture (Work in Progress - Current as of December 17, 2015 - Photographed by Dana Bishop): I started this sculpture way back in late 2014, and it sat around for the bulk of the year before I got moving again on it in the later half of 2015. It's a sculpture of one of the lead protagonists of my stories, who happens to be a werewolf enchantress. Much like the Yak, this project has encountered numerous technical battles along the way, including not fitting properly in a home oven, which meant I had to build an oven to bake it, so... suffice to say, she has continued to be a labor of love, and I'm really hoping I can finish her off in the near future. :) I figure I'm around 106 hours in at this point, and there are a lot more photos of her over on my Twitter accounts @KLeCrone and @Vaeflare. To date, this is very possibly the project I'm proudest of so far!

On to 2016!


All-in-all it's been quite a year, and I can't wait to see what 2016 holds! Some personal things I'm aiming to accomplish in the new year include:

  1. Complete "Sashah's Song" Sculpture
  2. (Re)learn how to mold and cast
  3. Finish one or more short stories
  4. Keep moving forward with one or more novels
  5. Learn some new art materials (CX5, I'm looking at you!)
  6. Finish at least one outstanding art project and selectively retire others
  7. Sell some new personal art
  8. Continue to infuse my unique vision into my work
     

Conventions/Festivals I Am Planning to Attend in 2016

Thank you for all your support in 2015, and thanks for joining me on my creative journey!

World’s First Butterfly Cosplay – Part 3: Bringing Monarch Brightwing to Life


Back in 2014 when I was still a Community Manager, I worked on an official project relating to a character for the Blizzard game Heroes of the Storm, and due to one thing or another, it took over a year for all the requested blogs relating to the project to finally be published on the official site, but at last in May of 2015, the final blog and photos were posted on Battle.net, and I wanted to share the final results here for posterity as well :)

Originally I shared with you how this project began and the various stages required to sculpt the Monarch Brightwing sculpture that will serve as the base of what may very well be the world’s first butterfly cosplay!* In the second part of this blog series, I showed you the colorful and creative steps that followed, and in this blog, we’re putting it all together and bringing Monarch Brightwing to life with a live monarch butterfly from my home garden!


The in-game model is seen on the left, and my sculpture is seen on the right. All it needs now is a regal monarch!

Where We Left Off
 

When we last left off, Monarch Brightwing was all painted, sealed, and ready for her guests, and it was time for everything to come together to complete this unique take on cosplay!  Here are the final results:


Did You Know?
 

Monarch butterfly populations have plummeted so much in recent years that the U.S. Fish and Wildlife Service now believes there might be reason to protect them under the Endangered Species Act.

You can learn more about how you can help raise monarchs and milkweed plants at MonarchWatch.org.

All monarch butterflies used in this project were hand-raised and released into the wild after photographing.


Outtakes!
 

Things don’t always go as planned when you’re working with one (or more!) live subjects, so here are some of my favorite outtakes of Monarch Brightwing and her fluttery entourage.


I'd highly recommend checking out the original blogs which are posted directly on Blizzard's website because there are a lot more photos and details about the process there (and with much better formatting)!


If you're interested in finding out more about Heroes of the Storm, you can learn more about this fun team brawler here on our official site. And if you work at Blizzard or manage to get a tour of campus, you can see this little guy currently on display at the Blizzard Museum!

Do you have any questions about painting materials, the creative process for this project, or raising monarchs? Let me know in the comments below!

As this project was done on-the-clock for work, all photos of Brightwing and my Brightwing sculpture are Copyright Blizzard Entertainment. All standalone monarch photos are copyright Kimberly LeCrone.

* - As far as we know! 

Tuesday, December 15, 2015

2005 Scale Model Project: "Wizard's Retreat": Part 3 of 4 - Water, Terrain Details, and the Wizard's Abode

Recap: 

In 2005, while I was busy attending the University of Southern California to pursue a degree in the Cinematic Arts: Production, I took a class for Art Direction. As our final project (which was worth 50% of our grade), I had to create a quarter-scale miniature model. I was more than a bit ambitious with my model, and I put a ton of work into it, which I enjoyed sharing with my friends over on LiveJournal at the time.  Here's a quick peek at the exterior of the end result!


In 2006 I created a series of three detailed posts which went through each step of the project. Unfortunately, since I was so busy, I never actually posted a final blog sharing the final stage and finished results, so I thought it would be great to post everything over here on my blog for posterity, and to finally create that final blog after ten long years!

As such, I hope you enjoy this flashback onto an early project of mine. While it's not sculpture in a traditional sense, it's projects like this which ignited my imagination and fed my desire to learn and improve, and this project is incredibly close to my heart.

I tended to be even more verbose back in my LiveJournal days, so I've shortened and edited some of the original text below from LiveJournal. This is the third of four blogs about this project, and you can access all available parts at the links below. These are the original images I posted in 2006, so they're also a bit on the small and blurry side, but there will be some nicer ones in the final blog: promise. :)

Enjoy!


Scale Model Project: "Wizard's Retreat": Part 3 of 4 - Painting and Refining the Base


At this stage what I was doing was trying to create additional realism, so I was using a variety of consistencies and colors/grains/textures of ballast, which is a sort of lightweight faux rock. I put some around where my rock faces were (since real rock faces fall away over time) and I put a lot more along/in the waterway. I paid particular attention to trying to make it seem as if the water had washed rock down the waterfalls over time, so in that bottom area, there are some dead logs and other debris that have helped to form a makeshift sort of "pool" of water. In that pool, I planned for there to be fish as well as lily pads and that sort of thing since the water would be slower moving/still there. :)

It was amazing how much planning ,time, and money all this was taking, but I was certainly in a "spare no expense" mindset at the time, and I viewed this as a portfolio piece for once I graduated college.


You can see some of the river plants I was working on here. Those long stem plants sticking way out of the water were there so I could keep track of the positions where the final flowers would be situated. All of those flowers are about twice the size of the head of a pin. We are talking small, and all of them were put together by hand: each separate petal and layer, down to the little bits of yellow pollen inside. I can still remember how much it hurt my eyes to make each of them.

Some of the landscape glue was also still wet at this point, which is why the glue appears white above rather than clear. I also worked on texturizing the riverbed at this point.
 
I actually did all sorts of weird stuff for realism down to some light green powder I blew on the right side of the riverbank there to be moss. :) I did something similar along the top of the rock faces, but unfortunately it doesn't appear as though I took any photos of it at the time, because it was starting to get down to the wire.

This is the future area where debris would have collected to form a sort of pool. I thought that would be something neat to have the bridge cross over it there. The final water level was supposed to be a little higher than where those logs cross. I even had to age and stain that wood so it looked like fallen logs. Regular sticks from outside don't cut it thanks to the scale issue.
   

This is a view looking down at the empty waterway, including a log that's precariously close to the crest of the waterfall. If you look carefully you can see the start of a deciduous tree on the lower left. You can also see where two smaller creeks converge before they reach the first waterfall.

I want to point out that each single rock had to be glued in place individually as this project would have to be driven all the way to my college for evaluation, so it had to be completely secure.


This was when I made a horrid discovery: the faux water I wanted to use was meant more as a coating than for depth as I intended to use it. I discovered that it was recommended for 1/8 of an inch deep every 24-36 hours, or else the layers below would never fully dry.

This created quite a problem because not only was the river intended to be a good 1 -1 1/2 inches deep in areas, but like a real river, it all ran DOWNHILL. So when the base was finally dry (and that included the glue from the plants), the liquid poured down the waterfalls rather than staying in place.

Also, at this point I believe there was only about a week of time left until the project was due, which made the water situation even more...problematic. I hadn't thought the water would be such a big issue, but as with everything: it was a learning experience I had to overcome. Therefore, at this point I halted progress on the actual treehouse to try and rush the base so that I could put in the artificial water once every 24 hours and pray I could get it sufficiently deep in time.

In the image above you can see two 1/8 inch layers of the liquid water. Which.... you might be able to guess wasn't very deep. It looked like there was a steady trickle, but not exactly something that would require two raging waterfalls.


Due to the complete lack of time, I realized if there were going to be ANY fish, I'd need to put them in ASAP. So, I sculpted this little fantasy koi (It's a WIZARD's retreat, after all). He is ridiculously tiny, and was a pain to sculpt, but alright, all things considered. :)


Next I put more work on the greenery and rocks, and I solved the "water running downhill" problem by using some tacky clay to block the waterfall faces. :) Take that, gravity!

There were are a few more layers of the artificial water shown above, and as you might be able to see: it's cloudy until it dries (and it wasn't drying completely within 24 hours, because I wasn't giving it enough time to dry because I was running out of time...).

At this point I also started on the walls of the tree house. As if I couldn't have made things ANY more difficult on myself, most of the walls were curved, so I couldn't use matte-board or something to make the walls properly, so instead I ended up building the walls stone-by-stone by hand.

That's right: every stone you see is individually placed. And trying to regulate the curves and the thickness and making it structurally sound? It was tremendously harder than it looks. If you see the tape along the front curve: that is actually where one of the cut away walls was going to be, so it could not be directly attached to the base. The intent was to make the wall removable so that I could pull the wall off if I wished to shoot into the interior of the finished miniature.

So I had to get the clearance as close as I could so it look like the wall was continuous, even though in reality it wasn't. I also had to make it look as if it was continuous by making the spots were it nearly connected hidden and concealed. I ended up offsetting the rocks along the edges sort of like the grooves on a key.

The "stones" are ballast as well, but I bought bags and bags of the stuff just TRYING to find suitable rocks for the walls. It took days and days of straight work just to get that much done because I was also having to wait on the glue to dry to keep things structurally sound as I went.


Here the dragon koi is in place in his second layer of surrounding water. While it was still cloudy at this stage, I was praying I could get the water level high enough that it would submerge the koi rather than have him skimming the surface like some sort of mutant shark. In the end, the lower pool was due to be nowhere near as deep as I wanted it since I could only put in 1/8th of a bit of water at a time. It was frustrating to say the least!

At this angle, you can see some of the lilypad flowers I made that were formed to appear open or closed.

And each of those flowers? They took me about an hour to craft each single one! I recall removing some of the other flowers temporarily so I could add more yellow pollen to the open ones to ensure I didn't accidentally get the powder in the still drying liquid water.


....oh man the memories this shot brings back. You can see bags of ballast there, and all sorts of containers of wood stain and paint trays, to different mediums to hold the stones in place, exact-o blades, rulers and just... wow that was a mess.

At this angle you can see the tape of the break away wall, and for the first time: stained glass windows! Those suckers had hand-cut moldings that were then painted and aged, and then I cut acetate to put in the "frames" which I then affixed and used a brand of glass marker and frosted glass paint to make it look like stained glass. Please keep in mind: I didn't have instructions of a guide for any of this: I had to figure out creative techniques for myself.

At this point I also realized I had to figure a way to make the windows sit IN the wall... which was a lot harder than it sounds. Especially to get them to sit "straight" when the rocks below them were all bumpy and un-fileable.

I went with a dark green and sort of burgundy color scheme. The little knight (which was: larger than a real person would stand), continued to serve as a temporary stand-in for scale purposes.


When looking back at these photos, I found it actually sort of strange at first that there were so few in progress shots, but that just goes to show how busy I was at the time. What you see below was days of work later, where I was trying to find ways to get the windows to stand in place on their own, but you can see the general look of the abode starting to take shape.

To the far right is the kitchen, and the far left is the edge of the Globe Room where the wizard can freely practice his spells. In the back is the door frame of the front door!


This window is so incredibly small in person. Under an inch high, I believe. Yet I frosted and aged each individual diamond pane. I also tried to make the painted acetate look like it had a subtle variation of color, like real stained glass does.


This is the front of the wizard's retreat some days later. I was way behind time on this, so I was starting to get freaked out I wouldn't even get to the interior in time. So I....didn't sleep much. I was finally getting to the point that some of the windows were nearly getting roof clearance too. Actually, aside from the base of the windows, this was one of the harder steps because I had to find a way to make the stones surround the window molding, which was extremely thin, so it required some clever crafting on my part, especially over those sort of pointed windows that lined the curve of the dining room. I also aged the glass and edges of the frames inside the windows a little.

It really didn't' help that the walls were curved, either. curved walls + "straight" windows = recipe for frustration.

In the background the bathroom/bedroom and front door share another cut away wall. You can also see the water level of the river is slowly rising, little by little.

 
This is a rear shot with the rear cut away wall removed so you can see the progress/development. This is where I determined the idea of a second story was out of the question at the moment considering the current scope of the project and time remaining. I just remember thinking how the dry time of that medium was horrible.


This is also the stage where I remembered that I needed to craft the continuation of the tree house up through the house. So I sculpted it out of more foam, and then started to layer on the paper mache strips while I tried to juggle adding more water to the river, and ever more rocks all over the retreat. If I'd cursed all the rocks on the base one-by-one, that didn't even vaguely compare to my frustrations on the actual building looming overhead.

Anyway: in the shot above the tree is upside down. That little opening on top is the nook where the cozy den would later be situated within.


At this point I finally got a proper scale miniature for the retreat, so that new wizard in the back was finally to scale. At this stage I was finishing up the walls, and I began work on finishing the tree that would support the Globe Room. Here, you can see work done on the trunk and roots, as well as the start of the branches.

 
I was slowly running out of time on the water, so I had to call it "done," so it would (hopefully) turn a bit clearer before the time the project was due for grading. So at this point, I added handmade lilly pads that I painted with acrylic and sealed. I wasn't totally done with the flowers yet, but at least the dragon koi was definitely underwater.

I might have gone a bit overboard with the lily pads, but I regret nothing. ;)


More days passed and I eventually cut away the clay along the riverbed/waterfalls, and (offscreen) worked to prep the waterfalls themselves. I also finished the walls/windows/doors, and in this photo you can see the front breakaway wall is in place, as well as the rear wall (which is also breakaway). I worked on a quick way of constructing the limbs and branches of the Globe Room tree that would act as a sort of canopy for the whole area because time was almost up.

At this point I also placed the continuation of the large tree trunk on top of the main structure so you could get a look at how it would go along when completed. It only has its first layer of paint on here, which is why it doesn't yet match the base of the trunk below it. I worked at this point to texture that as well as to hollow out the area where it is open in the den room in the middle. There is also a branch sticking out the side there to give an additional sense of scale.

 
Here is another view of all of those incomplete elements. Along the bottom right you can see where I was starting to plan out the stairs, which was another area where curves = very bad idea). Unbeknownst to myself, I made this project so very difficult on myself for art's sake.


Next I began using water effects to create and bulk up my waterfalls, as well as to add the sort of ripples in real moving water. At this point it was still wet, so it's not entirely clear but.... it was really neat to finally see! That log on the topmost waterfall appears to hold back some of the falling water.I like little unexpected things like that. :)


At this point there was more work on the Globe Room's tree, as well as a bridge at last! The pieces of wood seen here are all individually cut and stained, and I made sure they were just the TINIEST bit uneven, like a real handmade bridge would be. You can also see the start of stairs (also real stained wood) leading from under the archway root! :D

Though you can't see it: the final white and pink lily flowers were finally in place here as well.

Up on the edge of the Globe Room you can also see piece of furniture! A wardrobe of real wood that was individually put together and hand-cut/stained in a cherry stain. Many tweezers were involved. This wizard is rather well-off, so it figured to me he'd have such nice pieces of furniture. There are even tiny handles and a mirrored front! Pieces like that took so long to put together.

On top of the wardrobe is a potted fern, also handmade. I put little wires under the leaves so I could bend them how I wanted. (Sooooo tiny....) I had all array of magnifying glasses, tweezers, and pins for this stuff.

I realize this all seems so "quick" to post in comparison to how long it actually took, which is so many dozens of hours over weeks and months that I wouldn't even be able to keep count.

I hope folks are enjoying seeing this take shape. :) Apologies that I was a bit slim on photographing these later stages: I was too busy crafting it to even think to pick up my camera.


We're getting close! :) Stay tuned for the final blog, which is brand new and will be Part 4 of 4!

Friday, December 11, 2015

The Tweet That Spawned Story Sharing

How It All Started


So the other night I saw a few people from Facebook and Twitter post saying that for every Like, they would share something about themselves. The idea of such a social experiment sounded interesting to me, and I decided I'd do the same thing on my art & writing Twitter, except instead of sharing information about me, I'd share information about my stories, characters, and their world. I figured since it was pretty late at night, perhaps I'd get maybe a half a dozen Likes to prompt sharing, but... my original tweet got far more attention than I ever expected.
I received 64 Likes within the first few hours, which eventually hit 88 Likes! I soon found myself spending the evening sharing art and information. Since Twitter can be a bit of a tricky best to follow, I decided to put my first batch of replies together into a blog so that they can be more easily digested. I hope you enjoy them!

The posts below include a great deal of art that is my own, as well as pieces that were gifts or commissions from a variety of talented artists. Those pieces can seen below on Deviant Art where they can be enjoyed in their full glory.


My Responses


*****
Since the original Tweet has even more Likes now, I'll have to write up a few more facts to share soon! :)

Sunday, December 6, 2015

[Guide] Materials I Use for Sculpting

I'm often asked what materials I use for my sculptures, so I decided to put together a short guide! For a tutorial on one of my sculptures, please refer to my [Walkthrough]  "Steinir" Dragon Sculpture, which includes a FAQ, or any of the walkthroughs below:


Walkthroughs:


- "Steinir - Dragon Sculpture"
- “Butterscotch” – World of Warcraft Fan Art Yak Soft Sculpture
- World’s First Butterfly Cosplay: Monarch Brightwing
- "Sashah's Song" Werewolf Enchantress Sculpture (WIP)


Materials:
 

Polymer Clays:

Two-Part Epoxies:

Non-Curing Clays:

Sculpting Tools:

Armature Wire:

Eyes:

Paint:

Misc.

  • Aluminum Mesh
  • Aluminum Foil
  • Wooden Base
  • Needle-nosed Pliers and Various Tools
  • Two-part Plumber's Epoxy Putty
  • Hot Glue Gun and Glue
  • Tape Measure
  • Turntable
  • Sculpey Clay Softener
  • Clay Thermometer
  • Various Paint Brushes
  • Various Glass Bottles
  • Various Tupperware Containers
  • Oil-Based Wood Stains
  • Bottled and Spray Varnishes


Please let me know if there's anything I've missed so that I can add it to my guide!