

Introduction
Just after World of Warcraft’s Fourth Expansion, Mists of Pandaria, launched on September 25th, 2012, a dear friend of mine (Cynthia Reep, aka. Oneirosuchus) was visiting me from out-of-state for a trip to Southern California. In addition to attending (and for me: working) BlizzCon, we had a number of adventures in mind, including our semi-yearly creative projects. Somewhere amid our scheming and plotting, we decided that maybe we could try our hands on a soft sculpture, and with Mists of Pandaria on the brain, we decided that our first order of business would be to create yak fan art modeled off of the yaks in Pandaria.
On around November 3rd, 2012, our planning began in earnest, and to be fair: neither of us had any idea what we were in for, nor that this project would end up spanning a number of years. >_> …nearly three, to be exact. Much of these adventures were also chronicled on dozens of posts on my personal Twitter accounts @Vaeflare and @KLeCrone.

Concept, References, and Planning (November, 2012)

While I was busy working and prepping for BlizzCon 2012,
Cindy and I started to plan out the patterns for the yaks. They were to be
based off the noble “Blond Riding Yak” from World of Warcraft, seen above.
Neither Cindy nor I had much of any experience making soft
sculptures, so it was to be an interesting development experience! First we
planned out the construction and seams and I made a rough little model to help
conceptualize it in 3D. Next we finished a first-pass of the hand drawn pattern and sewed it up. While I was at work, Cindy also spent time editing and further refining the pattern, and later we did a second mock-up of the our yak, wherein we also increased the size of the project by another 20% or so. During this phase we were struggling a fair bit trying to figure out how everything would later come together. While we'd be more than happy to share these patterns with anyone who's interested, I'd like to mention that from this point on, we modified the patterns quite significantly as the project required us to, so... be warned. :)


Once we had what we considered a solid mock-up, it was time to venture out to purchase fabric and supplies (many of which would not end up being used, but ah well!) The colored fabrics were intended to be used for yak tack.

The Yak Fluff Begins to Take Shape


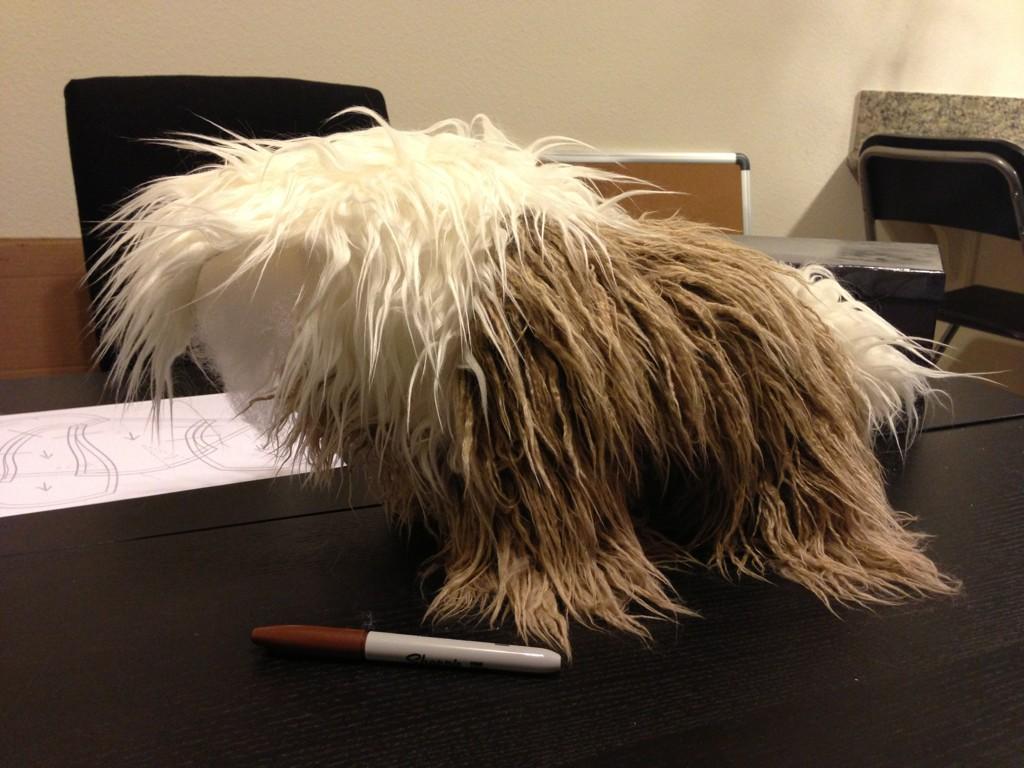
Next we cut out each and every piece of the pattern on our
shaggy faux “yak” fur. Since we wanted to keep it nice and long, we cut the underside used a
sharp blade rather than a scissors. Many,
many hours in, we had the primary bodies for our two fan art yaks sewn! Some
imagination was still required, but stuffing our yak bodies with polyfill helped offer the illusion that we were on the right track!
Legs, Horns, and More!


Next up, we began sculpting the front legs of our little
yaks. The core of them was aluminum wire and epoxy putty, which was then bulked
up with Super Sculpey. Cindy decided to have all four of hers be relatively the
same, but I opted to make the front and rears of mine different to make it more lifelike and (I hoped) to help counter-balance the head. Eventually all
eight of our little yak legs were complete, and then we moved onto the horns,
which were made with aluminum wire, aluminum foil, and epoxy putty, which was
then coated and detailed in polymer clay. Deep grooves were made near the knees where the fur would later be attached with small cable ties.


Cindy and I approached the horns differently, and it was
neat to see how they shaped-up along the way! Cindy’s looked more “realistic”
to me whereas mine ended up looking a bit more like the in-game model. I chose
to use Sculpey firm since I was worried that the horns would be fragile and subject to breaking since I had lots of bits that stuck out.


Next up, Cindy forged ahead on creating a head armature for
her yak and attaching the horns. Epoxy putty was used to provide strength and
stability. She quickly got his sweet face and ears sculpted! Dawww!

Mine was a bit further behind, but soon I got the head’s
armature blocked-out to what I hoped was to-scale with the bodies of our noble yaks.


While I was working on my yak’s head, Cindy had placed her
yak’s eyes in, and then used Aves two-part Magic Sculpt Apoxy in order to form
eyelids. We flopped the shaggy body over the head just to see how the World of Warcraft fan
art yak looked so far. So far, so good! Its smile melted our hearts.


While I continued sculpting my yak, Cindy started painting
the base coat and details of her yak. Though her semi-yearly visit for 2012 was quickly coming to a close, she made an absolutely fantastic amount of progress with her yak, and completed painting it! Admittedly, I was beginning to get a bit disenfranchised with the scope-creep of the project, but I told myself I'd catch-up in no time!
...oh, how wrong I was. >_>
...oh, how wrong I was. >_>
One Year Later...the Yaks Return! (November, 2013)


A year passed, and soon it was time for use to continue work
on our yaks! At this point, Cindy was more than a few steps ahead of me, so she
was working to attach the clay parts of the yak to the fabric parts, and I was
still working on slowly sculpting my yak’s head. Somewhere around this time I
realized I had committed myself to sculpting each clump of fur individually.
>_> I’d also decided that I would sculpt the ears separately and attached
them with wires in the hope that they could be poseable. Clearly, I needed to make this project even more complicated for myself.
Around this time I'd also learned that my Dremel Multi-Vise was invaluable as a tool for holding my yak's head aloft while I worked on it. Even somewhat hollowed as it was, it was incredibly heavy, and I (rightfully) worried about what the future would have in store for me once I tried to attach the fabric to the head.
Around this time I'd also learned that my Dremel Multi-Vise was invaluable as a tool for holding my yak's head aloft while I worked on it. Even somewhat hollowed as it was, it was incredibly heavy, and I (rightfully) worried about what the future would have in store for me once I tried to attach the fabric to the head.

Cindy made a LOT of progress with her yak, which she dubbed
Yakisoba! She made a gentle armature inside her yak which she covered with fleecing before attaching it to each hoof as well as the head. Thin cable-ties and some two-part epoxy were used to attach the fabric to the clay on the inside.

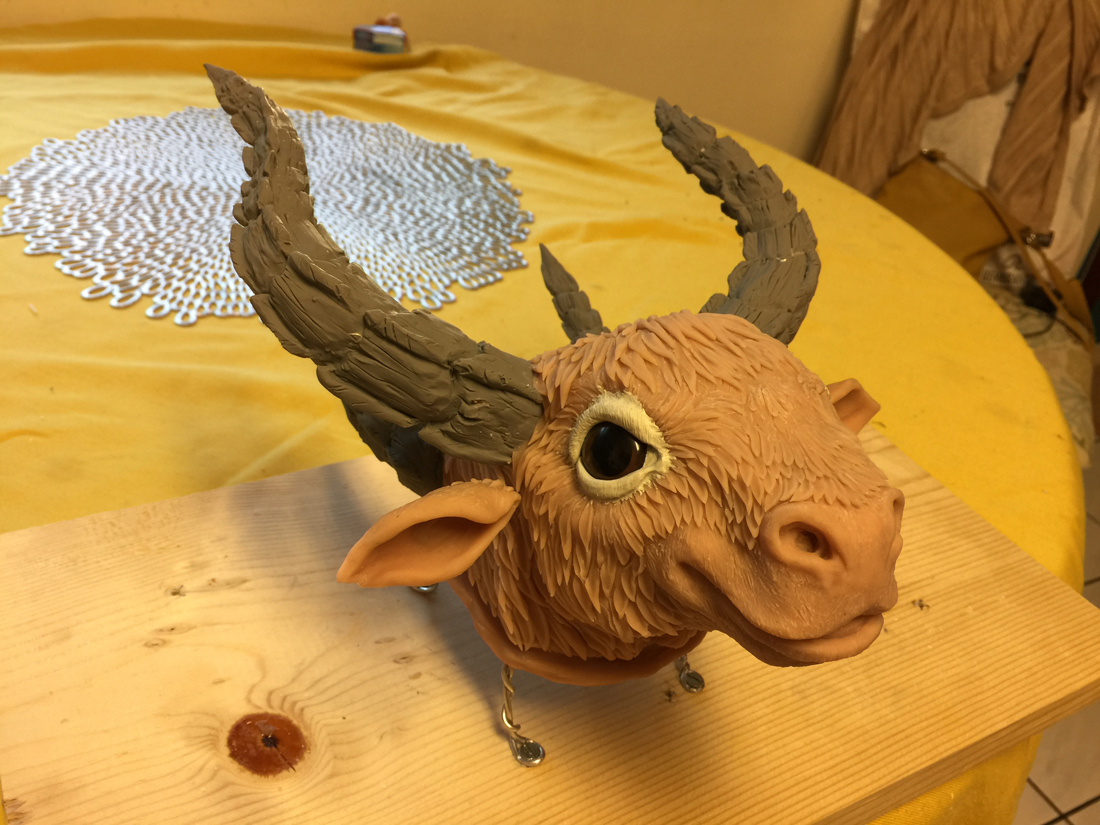
While Cindy was busy assembling her yak, I was still sculpting. As I worked, I sculpted the parts that were the furthest
out first, before layering on clay clumps further and further in.
Unfortunately, we got quite busy with our various adventures during her visit, and
the yaks went back into cold storage once again.
Another Year Later...the Yak Demands Attention! (January, 2015)


Over a year later, my dear Balaa invited me over for a weekend of arts and
crafts with she, Lorien, and WickedSairah, and I decided it was time to revisit my yak. And during that one glorious weekend, I got
on the bandwagon again, and made a TON of progress on my yak! Being around kindred creative spirits definitely was a breath of fresh air in that regard!
I really wanted my yak's face to look somewhat realistic, so I also spent a fair bit of time looking up yak references (they're fluffy and adorable, btw!) I finished all of the sculpting on the face and ears, smoothed her with 70% rubbing alcohol, and then it was time for baking!
I really wanted my yak's face to look somewhat realistic, so I also spent a fair bit of time looking up yak references (they're fluffy and adorable, btw!) I finished all of the sculpting on the face and ears, smoothed her with 70% rubbing alcohol, and then it was time for baking!


I baked it for
around three hours at a very low temperature (around 125 degrees Fahrenheit), and kept the oven door closed while it slowly warmed up and cooled off. Doing this helps prevent the cracking that can sometimes occur when the clay undergoes sudden temperature changes.


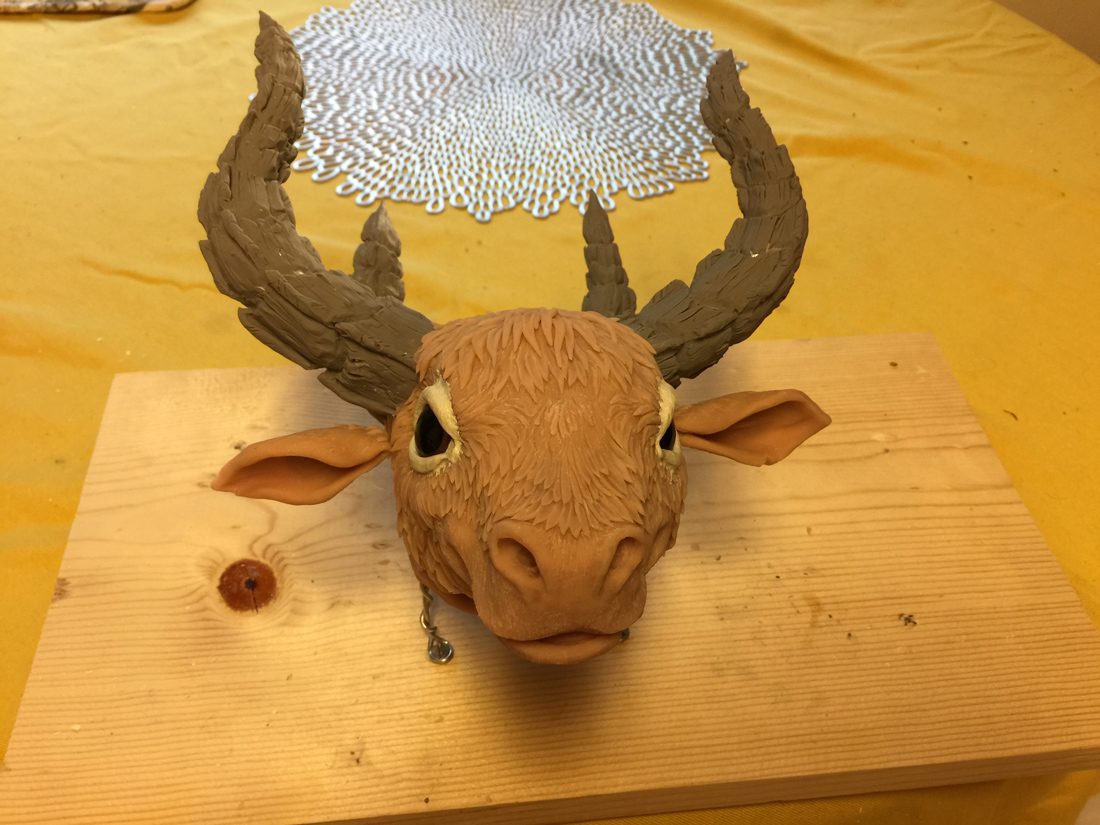


The yak baked up just fine, and then it was time to pop her eyes in and move onto eyelids! Like Cindy, I used Aves Magic Sculpt Apoxy in order to form eyelids
Painting My Yak


Eager to move forward and realizing I was putting in greatly more time to this project than we originally envisioned, I ended up splurging and ordered some cel-vinyl paints to use to paint my yak. The base coats went quickly, and I was extremely pleased with how well the paint took to the clay!


After a few thin coats of paint, I moved onto detailing,
antiquing, and sealing. I used matte, satin, & glossy polyurethane for the
sealant in various areas. While art is all a long process of pain and experimentation, if I could go back in time, I would have used different sealant on the fur and horns. Both ended up much glossier than I expected after three coats, but ah well! I feel like the yak really came to life during this phase, and even though I was certain that large parts of the sculpt would be obscured in fluffy yak fur, I still treated each area with care. These are actually some of my favorite photos of the whole process. :)


Assembling the Yak at Last!
From there I moved onto tinting the yak with the Copic air system. Unfortunately, there wasn’t enough propellant to do much. Fun fact: the D60 air can only lasts for around six minutes. :-/ As a result, I ended up ordering the Copic Markers ABS-1N Airbrushing System, which I would definitely recommend. It has a runtime of around 45 minutes. It acts a lot like a airbrush, except you're using dye pigments from the markers. This was perfect for my needs!


The next step for me was to assemble the yak, which was... a lot more difficult than I expected. The core issue I encountered was that the yak's head was so heavy that it wouldn't stand upright no less hold her head up. I tried using armature wire, you name it, but it was still too much weight to support itself, so I had to brainstorm and take on a new tactic.
I got the largest gauge of armature wire I could find, and then basically built a little cyborg skeleton for my yak. It was moderately successful, but unfortunately the metal points continued to bend. Thus... I began coating every square inch of exposed metal with EP-200 Epoxy Putty. I don't know how much I purchased and used over the course of a few days (thank you, Home Depot!), but it was absolutely obnoxious, but once it all set, the legs were at-once blissfully sturdy. The only problem was that he was still extremely front-heavy.
I got the largest gauge of armature wire I could find, and then basically built a little cyborg skeleton for my yak. It was moderately successful, but unfortunately the metal points continued to bend. Thus... I began coating every square inch of exposed metal with EP-200 Epoxy Putty. I don't know how much I purchased and used over the course of a few days (thank you, Home Depot!), but it was absolutely obnoxious, but once it all set, the legs were at-once blissfully sturdy. The only problem was that he was still extremely front-heavy.

Thus: I went out and bought as many steel fishing weights as I possibly could, stuffed them in socks, and sewed them into spine and belly of the cyborg yak. The head appeared to weigh around six pounds, and I ended up needing around eight pounds of steel counterweights to balance her properly. But balance, he did!
Soon it was time to twists my wrists inside that painfully small opening in the yak's back to do surgery to affix the yak's head in place...


And for the first time, I had a yak that was all in one piece! I was incredibly excited, and brought out Cindy's yak for a quick photo op. :) I'd spent what felt like ages trying to make my yak stand upright, and I was thrilled to see her standing on her own!


At last I could also test out posing the ears on the yak, which turned out really cute!
Time for the Details! (July, 2015)

Next up, I used a sharp blade to slowly trim the fur bit-by-bit on the yak. I used a blade rather than a scissors so I could keep the "wild" look of it, rather than creating crisp lines. I also used some yarn and wool roving in order to create a pocket of "fluff" to fall between the two sets of horns. I sewed and twined these pieces by hand before sewing them onto the underside of the yak's head "floof."


Shortly thereafter, I attached the poseable tail to the rear armature I'd added to the rump. I felt it really added a lot of personality to the yak. :)


Next up, I took out my Copic Airbrush and started dying and blending the fur. I used four colors of markers to do this, and had my blade out at the same time so I could trim any remaining bits of fur as I went. I wanted to give her a nice gradient so that her underside was darker than her topside. You can see the reference model I was using up on the cork board in the background. This really felt like everything was starting to come together at this point.


Real yaks and cows have some pretty crazy eyelashes, and I decided I also wanted to add some to my sculpture, so I tracked down a few options before picking my favorite and gluing them in.
Victory?


At this point I considered my yak done for all intents and purposes, and for a brief period of time I savored what it was like to finally call it "done" after so long. I decided I really wasn't interested in sewing the tack for it (it seemed silly now to me to think that anything that looked like a young yak would need a saddle anyway), and I had some fun taking photos, but still something gnawed at me...

The yaks we'd made were supposed to be based off the Blond Riding Yak in World of Warcraft, but I couldn't shake the feeling that it wasn't "quite" done yet, so I slept on it and held off signing the underside of her hoof.
Bells, Bells, Bells!


Then it came to me: what if I added bells to her, like the ones on the adults in World of Warcraft, only more petite? Once I got the idea in my head, I couldn't shake it. The ones in-game have three bells on one side and two on the other, and for my little girl I decided she should have two on one side and one on the other, to be similarly asymmetrical. The only problem was that there were no bells that looked anything like the ones on the in-game model: note even close. Thus... I decided to make my own out of raw copper sheets.


I patterned the bells off the reference sheet I had, cut them with metal snips, and then soldered them together with some copper foiling and a soldering iron. Part of me was definitely cringing at the thought of yet more cost tacked onto the project, but I thought the addition of little bells could look really cool.


I attached them to some horns with some modified dark green ribbon, and then decided I definitely wanted to add the little "bumps" that were on the bells in the in-game model, so I went out and made my own with some pearl findings, spray paint, and glossy sealant!
Putting It All Together at Last


I glued the copper "bumps" on with a two-part epoxy and then painted on some additional copper antiquing, and at last: Butterscotch was complete!
Putting It All Together
Taking Butterscotch out into the "wild" for a quite photoshoot was a lot of fun, and I'm looking forward to taking more shots of her with Cindy's "Yakisoba" yak when she visits next time!


While I generally prefer the outdoor shots, I also took some inside to show off some of the many details on this multi-year labor of love and technical frustration. The front legs are locked in place, and the rear two have a small range of motion on them, so she balances just swimmingly:


Information About the Finished Sculpture

“Butterscotch” – World of Warcraft Fan Art Yak Soft Sculpture - Started on November 3rd, 2012, Completed on July 26, 2015
Further Information available on DeviantArt.com: http://fav.me/d934c6z
Total size: 14.5 x 12.5 x 7 inches in size and around twelve pounds in weight.
Materials: Steel and Aluminum armature wire, steel epoxy putty, Super Sculpey, Sculpey Firm, quilting, poyfill, steel fishing weights, faux fur, fabric, ribbon copper, plastic eyes, acrylic paint, sealant, and lots and lots of love.
Time Taken: Approximately 100-150 hours over the course of nearly three years.
Time Taken: Approximately 100-150 hours over the course of nearly three years.
Thanks again for all of your wonderful questions and for reading my latest walkthrough! If you have any follow-up questions, don’t hesitate to let me know, and I hope you found this guide informative!
No comments:
Post a Comment