It's hard to believe that 2005 was ten years ago! That means that over ten years ago, while I was busy attending the University of Southern California to pursue a degree in the Cinematic Arts: Production, I took a class for Art Direction. As our final project (which was worth 50% of our grade), I had to create a quarter-scale miniature model. I was more than a bit ambitious with my model, and I put a ton of work into it, which I enjoyed sharing with my friends over on LiveJournal at the time. Here's a quick peek at the exterior of the end result!
In 2006 I created a series of three detailed posts which went through each step of the project. Unfortunately, since I was so busy, I never actually posted a final blog sharing the final stage and finished results, so I thought it would be great to post everything over here on my blog for posterity, and to finally create that final blog after ten long years!
As such, I hope you enjoy this flashback onto an early project of mine. While it's not sculpture in a traditional sense, it's projects like this which ignited my imagination and fed my desire to learn and improve, and this project is incredibly close to my heart.
I tended to be rather verbose back in my LiveJournal days (even more so than now, if you'd believe it), so I've shortened and edited some of the original text below from LiveJournal. This will be the first of four blogs about this project, which you can access at the links below. These are the original images I posted, so they're also a bit on the small and blurry side, but there will be some nicer ones in the final blog: promise. :)
- Part 1 - Conception to Early Production
- [Coming Soon] Part 2 - Painting and Refining the Base
- [Coming Soon] Part 3 - Water, Terrain Details, and the Wizard's Abode.
- [Coming Soon] Part 4 - Detailing the Wizard's Abode, Furniture, Props, and Final Details
Scale Model Project: "Wizard's Retreat": Part 1 of 4 - Conception to Early Production
In 2005, this project once tied as one of the two creations I was most proud of (the other being my film, "Beauty in the Beast" - More on that sometime), and yet, because of the stress of creating it that year, I never got around to documenting it properly. While his post is very image intensive, I also documented a great deal of my progress all through the way, so it is a fun adventure and labor of love. :)
I went..... overboard with it. One of the big reasons was that I felt it was a very unique opportunity to BUILD something in a manner I never had before. I've painted things, certain, drawn and sculpted things, yes, but I NEVER worked on models, really. So going into it.... I was sort of having to learn it all on my own.
Now, in film, were you to pitch a concept, you'd usually use a drawing, or at the very most, a matteboard model of a set or somesuch. Going this far into a model... well, that would be if you were going into a job in miniatures, and were wanting to show what your'e capable of.
For me, I wanted something unique that I'd be able to use to "sell" myself. To show how I could think things out and create based off of a picture I had in my mind. As such, in addition to creating the model (which was supposed to have an interior and exterior), I made sure that I could "film" or peer into it appropriately, and that I could properly plan how I was going to "dress" the set.
Anyway, I'm getting ahead of myself. :)
This is all in quarter-scale. That scale is EXTREMELY tiny, and is much, much smaller than, say, doll-house miniatures. How tiny is that?
This is a grain of rice next to a mortar and pestle. So when I'm saying "tiny," I mean it!
I found a nice example of a model I worked on in 2005 ago for a sitcom set. While at this stage it wasn't complete, you can see what a "traditional" set model usually looks like. Only the "built" sections of the set are constructed (not the furniture, for instance). This sitcom set would be used for a three-camera set-up with a live audience, which is why the one side is open and it is staged as it is. Everything, down to molding and door frames, were something I created.
You can even see a staircase by the fireplace (70's style, anyone? :) ), and a bay window and front door. Towards the center is a hallway and kitchen. Everything has dimensions, including the scenery backdrop, so if someone wanted to construct this set, I could swing right into giving the carpenters exact measurements, and they could run with it from there. This was to be the same scale I used for the Wizard's Retreat I was scheming.
Planning Commences on The Wizard's Retreat
The fun began when I started to plan my topic. I wanted to do something unique and very "me," so I decided early on I wanted to do an outdoor environment, kinda nature-y, and at some point I decided I would make a "Wizard's Retreat," which was basically an incredibly large tree in the middle of a forest which a wizard had made into a home.
After I decided on a general subject, I sort of... "stewed." I really didn't do that many conceptual sketches, because my mind was busy rolling over the "look" I was aiming for. Since I am apparently desirous of punishment, I decided I should have a river as part of the project, and of course some rolling hills and all that. In retrospect, it seems I was incapable of choosing a simple, reasonable project. It wouldn't be until many years later when I first heard the term "scope creep," but my goodness, that fit this project to a "T."
Here are some of the initial thumbnails I did with a fountain-pen. From early on I'd decided I wanted the staircase to wrap around the trunk and lead up to the front door, and that I wanted a portion of the house to be sort of like an open deck (left side), where the wizard could practice all array of magic or alchemy without setting things on fire. One must always be careful, yes?
So from this early stage I'd established I wanted to have the house situated around/in the tree, and part of it would be extended over the water to be supported by a smaller tree. (This wizard is eco-friendly, after all!). At this point I also planned on there being a second story, which ended up being cut out due to time constraints.
The first sketch I did is in the upper left. Just some overheads of ideas on treehouse/river placement. The one in the fart left also has the bridge over the river idea that I ended up using much later. Then I sketched the one below it, where you can see a sort of side view of things.
The sketch in the lower right was where I went "ooohhh, maybe I can have the stairs start from INSIDE the tree...." I also did some rough calculations on size based on the actual height of an average stair in comparison to how high off the ground I wanted the house to actually be. That helped determine the circumference of the tree trunk when I finally built it. I was surprised how much math and pre-planning went into this sucker!
Here is the next sketch I did, which ended up really starting to set the stage for the project. I dubbed the sort of open room the "Globe room" and used this sort of 3/4 view to really start planning in earnest. I decided on the bridge idea for sure, but I was still working out how to have the stairs start. I liked the idea of an archway, and it seemed like it would work better than the tree-trunk idea because of the angles/head clearance involved.
Anyway, the professor also asked me if this was a shared, or private experience for the wizard, and that really made me think: I mean, how far out was this place? Remote? Did he get visitors often? Foul beasties? Ninjas? That question right there really helped me think things through from a world building perspective.
This is when it started to come together. I decided that instead of an archway, that I'd let one of the tree's huge trunks be a sort of gateway through which the stairs would start. At this point, I'd already decided on that the river would fork together, and that I would try to make a waterfall or two along it as well.
This is a top-down view, and you can sort of see the staircase curving around, and then the front door is around the back of the house. I planned on a bathroom (or bedroom) in the rear, (conveniently by the "Globe Room" ;) ), and the whole area along the bottom of the diagram would be a sort of dining room/additional living space. Then nestled "inside" the tree would be a living room/den with a fireplace that would back into/share a wall with the kitchen stove. At this point there is also an overlay of the second story bedroom/balcony that never came to be, and the indoor stairs that would have led to it.
I'd also planned out where I wanted some trees, and more importantly: I planned out a variety of "break away" walls so that I could take then out at will and shoot into the interior. Neat, huh? :)
Time to Get to Work!
Then I began collecting supplies. At this point I'd guessed this might be a $200 project.... but it ended up being closer to $400 or $600. I had NO idea what I was in for, but regardless.
First off: I did some research on what to use as a base. I ended up with a certain variety of particle-board (I can't recall the name), and then on top of that, I used a variety of sturdy foam. The thought I had was that this would allow me to sort of "sculpt" the landscape, and also be able to hollow out areas for water/waterfalls. It would also HOPEFULLY be lighter than most of the alternatives I could think up. It was very important to me that the landscape look believable, and making it rolly rather than flat I hoped would aid the illusion.
I also did some research into the width of doorways and the dimensions of my car's trunk to make sure it would fit. I believe the final measurements were around 2 feet by 3 feet wide.
Let me tell you: sculpting that foam is a ~bitch.~ It gets EVERYwhere. It tracks EVERYwhere. This stage was interesting in the perspective I was seeing it coming together, but it was also a great deal of not fun. I think I ended up trying about 3 different types of glue to get things to "hold." Foam putty, foam glue, and a hot glue gun did the final trick. Present day me would have been using a whole lot more epoxy putties instead, but I digress.
Next I used loads and loads of foam and foam "bits" and sculpted them into the basic "form" of the tree. This included the "roots," and since the tree is so huge, I tried to make it look as if the outstretching roots sort of "disrupted" the surrounding landscape. Then I covered it with lots of papermache strips.
This is another angle so you can sort of see where I started to hollow out the riverbed. That was soooo all kinds of not fun. >_> I ended up using a variety of exact-o knives, before I settled on a exact-o saw (that's a real thing) and my all-purpose woodburning/soldering tool, which also comes with a sort of blade attachment that heats up (and cuts through foam sooo nicely, but smells NASTY while it's doing it). In later years I would learn about the existence of heated wire tools and rasps, but this was just the first step of my journey with foam sculpting.
What I remember most about this stage is how I had no idea what I was doing. I wished my class gave us more hard facts, but the professor was big on "self discovery and self failure" whereupon he said we'd learn a lot better. >_>
So, I covered the whole bloody thing in papermache strips, and found that my little idealistic concept of it being all rolly and wonderful was.... not a reality. I ended up having to use bits of foam, glue, rolled-up paper towels, newspaper, more papermache, and even air-dry clay to start to "work" the landscape to be like it was in my mind's eye.
As I continued to sculpt the landscape further, I refined the rolling hills, two waterfalls, and the beginnings of some mountainous/rocky outcroppings.
It was also at this stage I started to put some fibrous instant paper mache material called Celluclay II over the trunk of the tree and roots so I could
take a break from the other landscape, and reassure myself this was going to work see how it would look. I tried to keep the consistency rough and textured, since this tree is supposed to be huge in comparison to the surrounding landscape. This is yet another time where I wish present me could talk to past me and go "No no! Don't use the water soluble clay! Use two-part epoxies instead!" Ah well!
You can see some of the "trails" of roots I laid out here, as well as the opening through which I planned to start the staircase. For comparison's sake, that opening under the root on the left would be something like 10 feet high. So that is one
big tree.
And you can also tell by lack of treehouse, that I planned to work that as a separate stage. This is sort of the "underlying" landscape/base, and on top of that I built up various textures.
Front view. You can see a texture/sculpture tool (in yellow) there too, in my beloved tupperware cup of water. There are some rock faces I started on the left side there, and you can even see the little "root cave" to the right of the waterfall.
This is a close-up of one of the rock-faces I worked at. Some of these sorts of things were done by a sort of plaster/latex/rubber mold-making process, and other parts were done entirely from scratch. Then I had to use more paper mache and such to try to get it to work into the landscape I'd already sculpted. Neat though, huh? :)
This is a photo from a different angle. You can see more of the rock faces/sculpting here, as well as some debris I put in the riverbed. Also: you can see the waterfalls and where the water on the top level converges.
I did more root work (especially on the river side), and I also decided to toy with the root that would start the staircase, because I wanted it to look like it was a natural arc. I remember being pleased by how the mounds and such were shaping up.
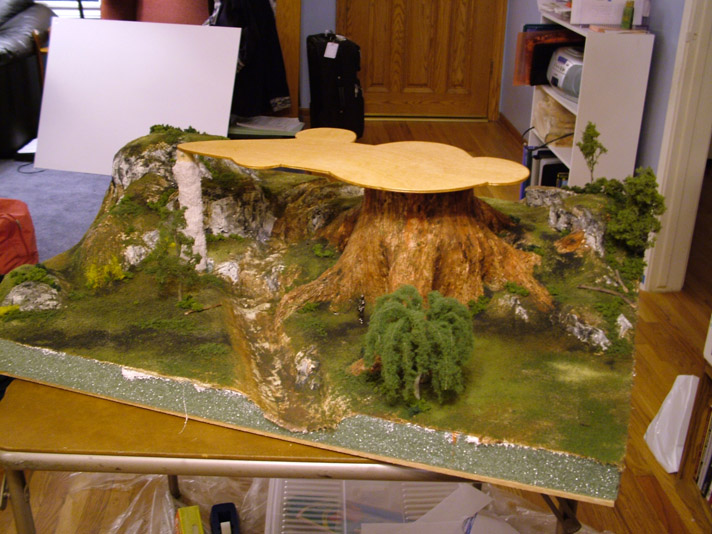
Many......... MANY hours of work later, I felt the "base" of this was approaching completion and I let it air dry.
Side view. More rock work and environmental sculpting. I had to make sure that as I was making the roots, they wouldn't obstruct the future staircase.
Another view! You can see the root archway very clearly from this angle as well as the root-cave and waterfall areas. I wanted to make sure that the landforms were very fluid so that there wasn't a sudden drop-off where the foam ended.
And these are close-ups of the rocks. I tried to imagine this tree's massive roots had broken up the land from how it once was, and I played with the idea of how the area might have evolved over time.
...You'd be amazed how LONG it took to get all these lumps of various shapes/sizes consistencies! I decided to have the rock face exposed mostly on one side, but that earth and such had settled over top of it in time. This tree has been around awhile, after all. ;)
So just think that opening is about 10 "feet" high. I'd LOVE to stumble on a tree like this in reality!
These photos show the the lay of the roots, land, and future water areas well. This part of the process was quite time-consuming, but it was an important part of laying the groundwork for what was to come.
Next up was painting the base, which I'll cover in the next blog about this project!