The smile of someone who is at present, exceptionally busy and craves balance.
The last few weeks have been exceptionally busy for me, and amid the general craziness of life, I've been doing what I can to work towards getting things back in balance.
I went on three separate trips (one for work and two for pleasure), which meant a lot of the productive creative schedule and routine I had going was interrupted by travel and an assortment of adventures. It also meant that the time I've had book-ended around these events has definitely been a lot more jam-packed than usual, and even with other busy periods on the horizon (BlizzCon, I'm looking at you here), I'm understandably eager for things to settle down so I can dig back in to personal projects with renewed gusto.
Travel Tidings
Seeing friends from near and far on my adventures to Seattle, San Diego, and San Francisco was a wonderful breath of fresh air! It's always such a blast meeting up with old friends and new friends alike to get together and be raptors just have fun and be myself. I certainly wish we had lush woods or towering redwood forests a bit nearer to me! They were exceptionally calming places to visit.
Art Adventures in all Shapes and Sizes!
It seems that part of my methods of trying to obtain a state of zen and stability during times like these is three-fold: 1.) Increased cleaning, 2.) Increased organization, and 3.) Increased beautification. I've been doing a lot of all three of these things these last few weeks, and one of the more notable examples of this is my tenacity for getting some art up on walls both at work and at home.
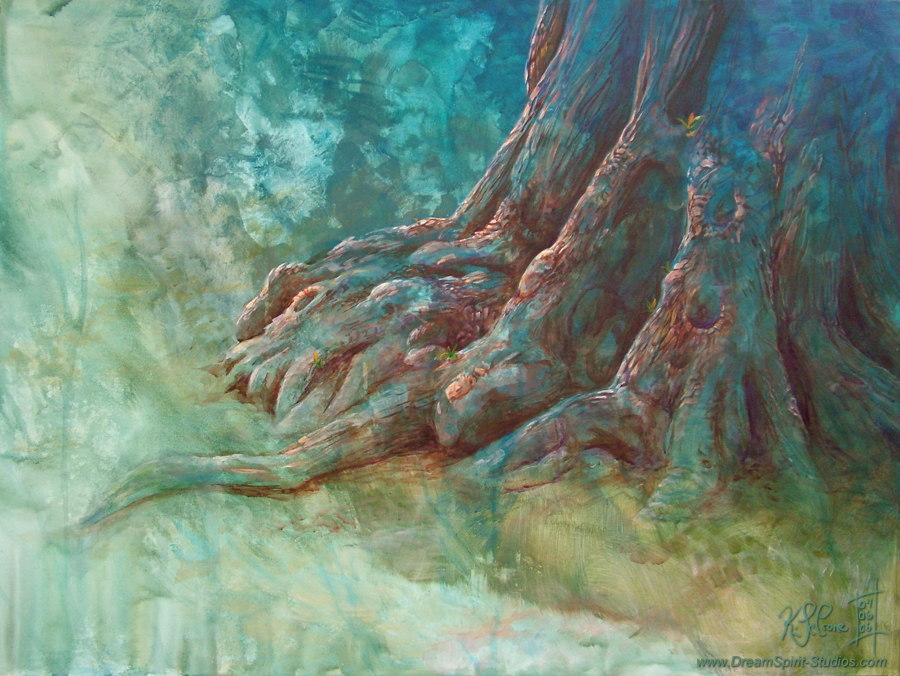
The first of these pieces was a 30 x 40 inch all-acrylic painting that you can read about here. It's one of my favorite paintings that I've ever done, and I've had it up on nearby walls for many years since, but it's never been framed. The few times I'd looked into getting it framed, I'd simply balked at the price and told myself I'd get around to it "some other year." For some reason, I thought it was time to finally dig in and "git er done," as it were. I was very pleased with the result, which I've hung above my desk at work with a bit of overhead accent lighting. :)
I also attended the first class of a "Sculpting the Figure from Life" class held at Blizzard last week! I'm really having fun working with Chavant NSP hard clay, and am eager to see how this personal project evolves in the coming weeks!
The bare bones of my next sculpture.
I also decided it was high-time I get to hanging up some of the loads of framed and matted original art I have at home! Here's a glimpse at some of the many pieces that are now hanging on the walls. You may notice a bit of a theme of familiar characters running through them, and that's no coincidence: over the years I've often commissioned artists to create their own interpretations of my story's characters. In addition to being gorgeous to look at, their presence on my walls also reminds me on a regular basis that I need to keep on writing so I can share my stories with others out there so others can see why this motley crew means so much to me!
I also hung up a few more pieces of art in my art/writing/parrot room above the cork-board that acts as a repository for reference images for my various projects. I will also be the first to admit that having a (much) less writing-only laptop and little area all to myself has really helped my overall productivity.
20,000 Words... 30,000 Words... So About That Writing...
The first three paragraphs of "Secrets of an Accord," still sitting in their first written draft, eagerly awaiting editing.
A few weeks ago I hit a pretty big milestone for me concerning my next novella, "Secrets of an Accord": I broke 20,000 words on the first draft! In the weeks that followed, my rush of productivity continued, and I'm actually sitting at over 30,000 words now. By my estimation, I should be well over 60% of the way through the first draft (hopefully further). Below is an spreadsheet chronicling one of my recent productive weeks in early September!
This, this was a good week.
Unfortunately, since the last few weeks became unexpectedly (and sometimes mind-numbingly) busy, I've decided to push back my next milestone for "Secrets of an Accord" to November 1st, at which time I hope to have the first draft of it completed so I can start editing it. While a part of me is sad that I wasn't able to meet my initial estimates for my given milestones, I'm also increasingly aware that as the scope of this project has grown exponentially in size, so it makes logical sense that the time to complete it will also increase.
Looking Ahead
The weeks ahead are due to be busy, but I'm aiming to do my best to keep moving forward with my various creative projects, and I'm looking forward to sharing them! How are you doing on your own projects and hobbies?
Back in January I was hard at work on a dragon sculpture that was a gift for a friend, and since I took a number of pictures of the process, I thought it would be fun to create a walkthrough explaining a bit more about my sculpting process.
The dragon isn't intended to be fan art or based off of any existing dragons out there, he was intended from the get-go to be a dragon of my own creation. As such, sculpting him was actually quite a freeing experience! I really had a blast trying to infuse some personality into him, and it makes me want to sculpt more scaled beasties.
Here's a turn-around video I made of the completed sculpture!
Before writing this walkthrough, I also sent out a signal to the internet asking for questions related to this sculpture so that I could be sure to answer them in this walkthrough. I received more than 33 questions in all, and I’d like to thank the following people for offering me their questions:
Paul Forest, Jill Harrington, Dorothy Tu, Thornbak, BoldKyky, Meerkatx, Kenichan, d1eSELxxx, Matt Amy, Erin Narumi Prince, Misti Lommen, Line Bering, helmine, and Waterfiend1909.
Now, onto the process!
Concept
It all starts with a sketch. For most of my art anyway, it actually starts with quite a few sketches, thumbnails, and studies. For this particular piece, I actually did only one initial thumbnail because I really liked it from the get-go and wanted to worry about the details after I got some references and worked on the actual sculpture.
Normally though, I would have started by doing numerous studies of a piece, and once I settled on a design, I sketch it out to scale so that later on I will have a rough guide for the piece as well as the ability to create an underlying armature that is to scale to the actual piece.
For the Monarch Brightwing sculpture I recently completed, you can actually see this step in the background of the above image. I sketched the figure in a profile view on a piece of paper and resized it using a scanner and printer until I was happy with the exact size, and then I sketched in where each of the armature wires would be inside the sculpture. From there, I could use those lines as a guide when I was measuring out armature wire and affixing it to the sculpture’s skeletal frame.
In the meantime, though, this is how things started to shape up…
References
Artists have different feelings about references, and I for one am a strong proponent of them. While I may have a general idea about how different things look (creatures included), I certainly don’t have all of the details surrounding them down pat, and don’t pretend to.
Thankfully, we live in a digital age where you don’t need to have a live crocodile nearby to get a reference for one, and I take full advantage of that. I’m not so much a fan of trying to take an image and copy it outright, instead I usually try to print out a wide number of references so that I can be inspired by photos and living things, but instead work to make pieces feel like they are my own, and can stand up on their own right.
As such, for this particular piece, I was very much aware that there are a lot of existing dragons already out there. From Smaug to Toothless, DragonHeart to the dragons in Game of Thrones, right off the bat I was very aware that I wanted my dragon to stand on its own right and not to be seen as derivative art. As part of that decision, I decided that I would entirely avoid looking up existing dragons as references, and would instead focus purely on real creatures. In doing so, I hoped that I would be able to create something that felt original in its own right.
After making this decision, I scoured various communities and Google image search for references to take inspiration from. I pulled high-resolution images of komodo dragons, horses, crocodiles, alligators, iguanas, bongos, deer, kudu, and the occasional velociraptor, because, well, dinosaurs.
After I’d sorted out the references I wanted to use, I then laid them out in Photoshop and created mirrored images for more photos. I did this because for me at least, it’s a lot easier for me to sculpt from multiple angles if I have references for all of those angles. There’s less for my brain to interpret that way, and I’ve found it incredibly helpful.
After getting everything in order, I printed out the images and got read to post them to my corkboard!
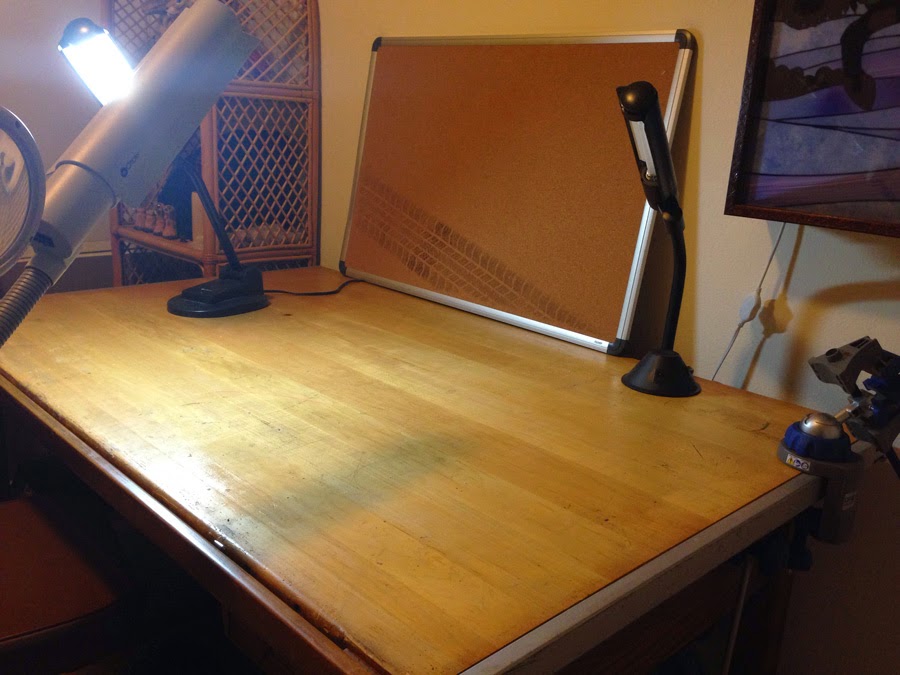
Workspace and Lighting
Before and after I complete projects, I try to clean out my workspace and start fresh. Of note here is a three-point natural lighting set-up (which is invaluable), a corkboard (for posting sketches and references), My Dremel Multi-Vise (for holding works in progress), and a self-supporting magnifying glass.
The more comfortable you are in your workspace, the easier it is to get a lot accomplished!
Armature Materials
I’ve tried a few different approaches to building armatures over the years, and for this particular sculpture, I opted to start with a wooden base. My intent from there was to attach a 6 by ½ inch of galvanized steel piping to it. This piping would be secured by screwing on a matching ½ inch flange with four screws along its base.
Seen above:
Aluminum and aluminum alloy armature wire
Aluminum mesh
Wooden base
Needle-nosed pliers and various tools
Two-part Plumber’s Epoxy Putty
Hot glue gun and glue
Tape measure
iPad and speakers (Because music and Netflix are necessary)
Not seen above:
Sculpture tools
Aluminum foil
Turntable
Various gauges of armature wire
Turpenoid
Rubbing Alcohol (70% and 91%)
Sculpey Clay Softener
Sculpey Firm
Sculpey III Black
Super Sculpey
Clay thermometer
Various acrylic paints
Various paint brushes
Various glass bottles
Various Tupperware containers
Amazonite beads (to be used as eyes)
Oil-based wood stain
Satin spray varnish
Glossy clear coat
Storing Conditioned Clay
I prefer to store my clay in thin slices within a sealed Tupperware container that I’ve lined with aluminum foil to try to keep it the right consistency. But polymer-based clays like Sculpey are bound to dry out, sometimes simply because you purchased an old batch, or perhaps simply because you haven’t used your clay in a while. But not all hope is lost! As long as the clay isn’t too far gone, it can often be brought back up to speed and reconditioned!
If it’s just a little dry, you can try applying a thin lair of turpenoid to it using a paintbrush, but if the consistency still isn’t to your liking, you have other options, too!
Mixing and Reconditioning Clay
If your clay has gone stale, and/or you’re interested in mixing different types of compatible clays (I tend to prefer a mix of ½ Super Sculpey Firm, ¼ Sculpey III Black, and ¼ Super Sculpey), what you can do is chop the clay up into small pieces (1x1cm cubes or smaller) using either a cutting wire to stainless steel blade, and then marinade them overnight in an airtight tupperware container by coating them with a thin layer of Sculpey Clay Softener. After the pieces of clay have had some time to marinade (I usually leave it overnight), you canning I ran them through an electric or manual meat grinder as many times as needed until the clay reaches a good color and consistency. From there, you can then run the pieces of clay through a clay roller to finish them off. The result? Renewed clay!
As a strong suggestion, I would recommend purchasing a separate meat grinder that is used only for clay, so the chemicals you’re using don’t get in your food. After you’ve used your clay meat grinder, it’s also a good idea to thoroughly clean it out before storing it, since the clay will dry out over time. If you’re having difficulty cleaning it completely, try running bread through the meat grinder to help clear it out.
Sculpture Tools
Another thing that is important for sculpting is to have the right tools available. I have probably around a hundred of them at this point, and I can tell you that for any given sculpture, I probably only use a dozen or so while I’m actively sculpting. You can buy sculpting tools at art stores, online through retailers like Ken’s Tools and Anatomy Tools, or you can make or modify your own. My dentist is awesome and he’s even given me some tools too (it never hurts to ask)!
Building the Base Armature
At this stage I’d gathered my materials, and had begun to work them into a base armature. First I’d attached the flange to the wooden base and screwed in the steel piping to it. This part of the base would remain freely removable, allowing me to separate the base of the sculpture from the sculpture itself at-will.
After I’d attached the base hardware with some screws, I created a basic outline of the head in a thick gauge armature wire and then wrapped it in a thinner wire. I did this to ensure that the layers on top of it would have something to adhere to.
After doing this, I mixed two-part plumber’s epoxy, which you can see in the grey in the photo above. Unlike Sculpey, which is a polymer clay that hardens in a conventional oven, two-part epoxies cure by virtue of a chemical reaction that occurs when the A and B parts of their mixture are combined. So for Plumber’s epoxy, you mix two types of clay together, and they cure and harden in about fifteen minutes.
I chose to use this on my sculpture’s armature to form points that would be hard and immobile, and to make sure that the armature was solid so that it could support the weight of the clay that would be going on top of it eventually. At this stage I had also decided that like my initial sketch, it would have four prominent horns, so I created and attached the armatures for those as well.
Aluminum Foil Time
After I’d properly wrapped and solidified the wire portion of the armature, I then went in and started to bulk up the figure by wrapping it with aluminum foil. Where needed, I used a hot glue gun to help layer on the foil. This underlying structure needed to be incredibly solid since it would need to support the weight of the clay that would be layered atop it.
Time for Clay!
Next, I began to layer on the clay. At this point I wasn’t concerned about details so much I was about trying to build up form and a generally symmetrical shape around the whole figure. The speckled grey curve at the bottom is the turntable I used to fluidly access all sides of the sculpture quickly.
In terms of references, at this point I was referencing horses quite a lot.
The Dragon Begins to Emerge...
With a few more hours of work, the dragon starts to take shape. As part of my process, it was during this stage that I inserted the Amazonite beads I had picked out for eyes. Using natural stones for eyes can be a bit risky in a sculpture because they can react poorly to heat (either by changing color or cracking), but I’d run some other amazonite beads through my oven as a test and found that as long as I kept the temperature down, I should be fine. Alternatively, I could have used glass taxidermy eyes, which are available online through a variety of retailers, including Van Dykes Taxidermy.
Putting the eyes in him also gave me the ability to better get a feel for his expression and general disposition. He felt sentient to me. Knowledgeable. Clever. Patient. And these were traits I could further refine during the sculpting process.
It was during this stage that I was also trying to determine just how I wanted to cut the figure off, which was a consideration I’d had far too late when I was sculpting my Deathwing piece some years earlier. In the end, I decided that I would show a bit of the figure’s shoulders as opposed to just ending the figure at his neck (which felt awkward to me). I felt like it made it so that he could either be interpreted as a traditional dragon, or perhaps as an anthropomorphic dragon that walked upright. I leaned towards the latter, but it's left up to the view to wonder how the rest of him looks. :)
More Anatomy
Progress continued on the dragon bust. In particular, I was still trying to work out the anatomy of the figure before I start smoothing and detailing it. While I claim to be no master of anatomy, I really tried my best to also make him read well from multiple directions, and to have a sense of rhythm and flow to his forms. The areas around the eyes, nose, and mouth were especially important for me to get “right,” and you might be able to see the influence of a number of real animals in those areas. I also bulked up the jawline since I wanted to feel like there was real power behind those jaws.
During this stage I also tried to rough in the horns, which were initially inspired from the thumbnail I’d sketched early on for this fella. They weren’t necessarily working for me, but I figured the sooner I got them in, the sooner I could figure out why they weren’t working.
Detailing Begins
Around this time I was realizing that if I wanted to get the sculpture done within the month, I would have to pull myself back from heavily detailing this sculpture. As such, I told myself I would try to give the impression of a lot of scales, but I might not be able to detail them all individually as much as I wanted to because there simply wouldn’t be time for it.
During this stage I hadn’t really smoothed him yet, but instead I worked to block in his many scales. For the moment I was focusing on one side of the figure so I could see what was and wasn’t working.
Sculpting Both Sides
I love the little fleshy area under his noble chin. :)
The dragon sculpture was moving along, and I spent some time trying to mirror the scale patterns I’d created on both sides. I also spent a lot of time at this stage trying to get him to get the forms and scales to read well from multiple angles, and he was slowly getting there.
At this point both sides were mostly sculpted, and I just needed to finish detailing the face and horns, smooth him out a bit, then add a bit of battle-damage, and then bake! Unfortunately, I still wasn’t really committed to those large horns, and you can see me tweaking them a bit here and there trying to make them work. But all good things in time…
The Kudu Horns Come Out
At this point I was still working to mirror the one side of the sculpture to the other and decided that it might be easier if I took a photo of the “completed” side, and then went into Photoshop and mirrored it and printed it out. Sure enough, doing that helped me speed up the process, and you can see that print out in the far left.
I re-cut the bottom of the sculpture to give it a better flow, and at this point I also decided that since the horns weren’t working for me, it was time to pull out my kudu reference horns and see if I could figure out another approach.
Completed Horns and Smoothing
Suddenly, things started falling into place with the horns as I tried to sync their gentle twisting. I also added some horns and scales to the nose and face area to improve the overall flow of that section.
At this point I added some additional detail and weathering to the figure, and then I used a paintbrush to go over the figure in rubbing alcohol. I used 70% rubbing alcohol first, as it’s much less abrasive than its 91% strength counterpart. Doing this allowed me to gently smooth areas and to get rid of stray pieces of clay that were left over from subtractive sculpting.
After completing this step, I them went in with 91% strength rubbing alcohol into areas of the sculpture that I wanted to smooth further, or needed help blending. Once that was done, I let the sculpture sit for a few days so that the chemicals could fully evaporate before baking.
Baking and Beyond
...There comes a time when you realize that you missed a step in the planning stages, and this moment… would have been that for me. Due to the support pipe, the sculpture would not fit vertically in my oven. :/ It was time for a new approach!
There was nothing that a little ingenuity (and a trip to Home Depot >_>) wouldn’t fix! I ended up buying an additional piece of piping as well as a 90 degree angle piece and counterweight. After securing the contraption onto the base with screws, it was baking time!
I baked him for 175 °F for around four hours. I’ve generally found that I get less cracks if I back at a lower temperature from an extended period of time, but also if I leave the sculpture in the oven to cool overnight so that it slowly returns to room temperature.
Baking was a success! The dragon incurred no cracks and his gemstone eyes didn't darken noticeably! During the baking process, the figure loses its glossy lustre and since I rather liked that look, I opted to varnish him.
Next, I masked his eyes and sprayed him with three goats of a clear satin sealant. After that, I used a brush to apply glossy highlights to some of the areas I wanted to add contrast to.
During the sculpting process, I’d also been working to sand and prepare wooden base for staining. After three coats of oil-based stain, I let it dry for 48 hours before applying three coats of semi-gloss spray varnish. Once that was complete, I affixed the flange and then screwed in the completed sculpture.
In order to make the base look a bit nicer, I then painted it with a few coats of flat black acrylic paint before sealing it with a flat sealer.
Unfortunately, at this time I was racing towards a self-imposed deadline, so I didn’t take as many photos as I may have liked to during these final stages. But lucky for me, I have incredible friends, and one of whom offered to photograph the completed sculpture prior to shipping so I had something to document it aside from my haphazard iPhone photos.
Information About the Finished Sculpture
"Steinir" Dragon (with Base) - Completed on January 26th, 2014
Sculpture size: 5 x 3 x 7 inches, made with wood, a steel and aluminum core, and sculpted in 1/2 Super Sculpey Firm, 1/4 Super Sculpey, and 1/4 Sculpey III Black with amazonite eyes. Sealed with a satin coating and hand-painted glossy highlights.
I was sad to pack this fella up and ship him off across country, but I was downright thrilled to surprise a dear friend of mine with this handsome gent, and even MORE thrilled he arrived intact!
Bonus Q&A
From Paul Forest:
Q1. Do you intend to cast it, or paint it?
A1. No. For this particular sculpture I intended from the get-go for it to be a one off, as it was a gift for a friend. I looked into having it 3D-scanned for fun, but the cost (around $500) was prohibitive for me for a project I never intended to mass produce. I haven’t done casting in many years, but I’m not opposed to trying my hand at it again for the right project!
So far as painting goes, I was never intended to paint this particular fella. Not only was I working against the clock, but I have a certain fondness for letting light and shadow define the sculpture. I did paint a recent sculpture, Monarch Brightwing, here that you can check out, though!
Q2. Is it a solid piece, or made over an armature?
A2. It’s made over an armature that I would consider basic at best. My main concern was ensuring that there would be enough support that I could curve the head and neck without risking it sagging or warping from the weight of the clay.
Q3. Why Sculpey?
A3. In terms of clays, I’m probably most comfortable with Sculpey, and because I was intending to make a one-off sculpture, it made sense for me to use it (as opposed to clays like Chavant or Monster Clay which require a final molding/casting phase for a final product). As I knew I would be shipping it, I tried to keep the shapes large and sweeping so they didn’t have a high chance of breaking during the journey across country, but if I had wanted to add on some more fragile bits, I probably would have done so in Aves Apoxie FIXIT Sculpt, which is a ~4 hour two-party epoxy clay that cures to be incredibly hard.
Q4. How much time in the 2D design phase vs actual sculpt?
A4. Honestly this piece was a bit of a rare exception for me. I spent very, very little time in the 2D design phase (maybe 30 minutes?), though I usually spend a fair amount of time in this phase. In contrast though, I forced myself to spend quite a lot of time in the 3D concepting phase. I would actually wager that about 40% my time working on this sculpture was in that phase, because I wanted it “done” before I moved onto detailing. By the time I got into the detailing phase, I felt like all the hard work had been done, and it was very intuitive and fun from there on out (though a lot of work, of course!).
Q5. Did you use any references for textures or anatomy?
A5. Many! I cover them in the “References” section of this walkthrough, but I stuck with real animals and no dragons. In terms of textures, I stuck with real animals as well, and made all textures by hand (as opposed to using silicon patterns).
From Jill Harrington:
Q6. First thing that pops into my head is: how did you ‘gloss’ it? Burnishing, rubbing, painting, whatnot….
A6. There are two main ways to do this. One is that you can use cans of spray paint varnish, or you can apply it with a brush. Both methods have pluses and minuses:
For spray varnish, you can get a very even and streak-free coat, but it goes everywhere and is super sensitive to temperature and humidity. If it’s too hot or cold or humid out, using spray varnish can cause the chemicals in it to fog up and ruin your piece! You also have to make sure to mask areas you don’t want to spray to get into (such as the eyes).
For brush varnishing, it is labor intensive and you are more likely than not to get some brush strokes in your final clear coat, but on the upside: you can be very specific with areas that you want painted. For me, I liked having some of the more pronounced shapes on him to be glossy to contrast with other areas of him which were satin in lustre, so I painted them all by hand.
Q7. Do you start with a larger base and then sculpt down or do you build up (not even sure how it works)
A7. I generally start with something small and build up. It’s considered additive sculpture, because you add on to create the final piece. In contrast, there’s subtractive sculpture, which would be something like woodcarving or marble sculpture, where the artists start with a solid block of material and then subtract material from it to get their final piece.
Q8. Honestly I think people would benefit the most from good solid armature knowledge.
A8. Unfortunately, I don’t think this sculpture has much to write home about in that regard, but the first blog in my Monarch Brightwing blog series has a bit more info where that came from, and Mangakasan has a great tutorial on armatures, too!
Q9. Do you need to be good at drawing to be a good sculptor?
A9. Nope! Having some basic level knowledge helps, but I know quite a number of badass sculptors whose sculptures far exceed their level of drawing proficiency. And that’s totally okay! We can’t be masters of everything, and people should feel free to explore and experiment. :) If you’re looking to get into sculpting, here's some of the most helpful stuff I've seen online:
The maquette tutorials by Smellybugs. I've tried to look them up, and it appears as though the images in the first are mostly missing, but the second one is showing up just fine. Arugh!
Q10. Eyes are important, how and when do you decide shape and color?
A10. Usually I pick out and purchase the eyes before I even start a sculpture! To me, they sort of set the mood for the whole piece, and in some cases I actually build the piece around the eyes I’ve picked out. All of the eyes I use are either full rounds or half rounds because I like to give the impression of real eyes. For this particular sculpture, I decided to use real amazonite eyes after looking through my bead box and finding two that seemed to have a vein running through them that reminded me of a serpent’s pupil. Thus, Steinir’s eyes came to be!
Q11. There are many kind of dragon heads that people varies; what made you go with the more scaly, short-horned calm expression?
A11. I think part of the reason I went with the expression was that when I popped his eyes in, that’s just how the figure read to me. He didn’t seem like a snarly sort of guy, and I think keeping the teeth hidden inside the mouth helped. If you actually look at my initial thumbnail, the teeth were all visible, but I realized when I started looking up references that with the exception of crocodiles and alligators, most critters I looked up actually had teeth that were hidden inside their mouths, and I kinda dug that vibe since I wasn’t trying to make this dragon look predatory. He’s calculating, but not a mindless predator. ;)
In terms of the scales, I enjoyed doing the textures on my Deathwing sculpture, and I was eager to try sculpting different types of scales that weren’t based off of an existing character. I actually might have tried to create longer horns, but I was worried that I needed to keep the sculpture pretty compact since I knew he would be being shipped across country.
I've always wanted to give it a try at sculpting so I have a couple questions.
Q12. What materials/ tools do you use to sculpt? I've seen some people use a metal wire frame as a skeleton to help with the structure but not sure how to go about making one.
A12. I listed a lot of my tools above in the “Armature Materials” section, but the armature on this fella was pretty basic. If you want to get a better idea of how to make one of your own, I’d suggest you check out Mangakasan, who has some great tutorials on armatures.
Q13. Did you sketch it out before you started the physical piece?
A13. For this piece I sketched out the most basic thumbnail imaginable to get a feel for the general shape of the piece, but I did most of my concepting during the initial sculpting phases of this particular piece.
From Matt Amy:
Q14. Do you primarily focus on busts, or do you also work on full figures?
A14. I’ve probably done a 50/50 split between busts and full figures at this point. Busts are generally quicker and less of a logistical mess, but I enjoy doing both as time allows. :)
Q15. Also- do you put any armature inside to support your pieces?
A15. Yep! Even the smallest sculptures of mine have itty-bitty armatures to help keep them looking fit during the sculpting and baking process.
Q16. Do you find it's easier or more difficult to work with fantasy subjects as opposed to non-fantasy based subjects?
A16. I find real subjects to be a bit easier because there are usually things you can reference directly. If you want to draw a woman in a chair, you can take reference shots of a woman in a chair and proceed directly from there. That’s not the case if you’re trying to draw a mechanical hummingbird. It leaves so much more up to study and interpretation, which is probably why I tend to gravitate in that direction. I love trying to challenge myself to improve in areas I’m uncomfortable with.
Q17. What's your favorite subject to sculpt? Why?
A17. Probably dragons, because there are just SO many different ways you can approach the subject matter. That and I love noodling and detailing, and their scales and patterns leave me a lot of room for freedom and experimentation there.
This piece still amazes me to no end ummm lessee..
Q18. Time wise how long did it take?
A18. He took me about a month and a half of work on-and-off over the holidays, and my best guess is he took me somewhere around 25-40 hours, but I stopped keeping track early-on since he was a gift, and the holidays were a bit crazy. But he was definitely a labor of love, and I was downright THRILLED that he arrived at his final destination in one piece!
Q19. What animals did you use for references/get ideas from? (I always suck at this part lol!)
A19. I opted not to use any existing images of dragons as reference, and instead pulled-up high-resolution photos of komodo dragons, horses, crocodiles, alligators, iguanas, bongos, deer, kudu, and the occasional velociraptor, because, well, dinosaurs.
I also looked up skeletal information on these same creatures so I understood what areas were boney, which were muscly, and which were fleshy or fatty.
Q20. Always wonder how you can keep proportions if building up (and symmetrical)
A20. I think the biggest thing for me is patiently building up the underlying structures before I start the detailing phase. Also, when I go to work on detailing the opposite side, I took a photo of the “completed” side, and then went into Photoshop and mirrored it and printed it out to use as reference for the unfinished side! Sometimes I also use calipers to help me measure a sculpture as I’m working.
From Misti Lommen:
Q21. “Does the post bend and run through to his nose?
A21. It does not, but you can see how it attaches in the "Armature" section of this walkthrough!
Q22. How does his neck support the weight of his head? Or is the sculpting material just that strong?”
A22. There is an underlying armature that supports the weight of his head. While Sculpey can be strong, it’s not strong enough alone to support that much weight without risking sagging or breaking.
Q23. His green eyes – are those bits of glass or colored sculpey?
A23. They are amazonite beads (a natural gemstone).
Q24. Did you craft each scale separately and then apply it to the neck or did you work it and extrude the scales from the neck material directly? Same for the rest of him.
A24. A bit of both, actually. For scales that I wanted to pop out, I would create some of the basic shapes with clay between my fingers before sticking them to the sculpture and adding detail, but for scales that were recessed, I sculpted them by going in with a ribbon tool and removing clay around the edges of the scale I was trying to create. You can see the difference most clearly by comparing the scales on the shoulders to those along the side of the mouth and face.
Q25. Did you sculpt the neck and head and then create the details with a separate batch of clay and apply them? Or did you use the neck and head clay to create the detail?”
A25. I was constantly adding new clay as well as removing existing clay during the detailing phase of this sculpture in order to create the variety of scales you see in the final sculpture.
Q26. What was your inspiration? Did you sculpt this based on a photograph or pre-existing image? Or did this come from a vision you had regarding how you think one should look?
A26. I think for this particularly piece it came down to me going “I want to sculpt my friend something. He likes dragons, so that would be cool.” And then I went forward with trying to figure out what I could sculpt that would be ready in time and would survive shipping. I actually named the final sculpture off of a character of his (“Stein”). But in terms of inspiration, I kinda just let this piece shape itself and I had fun with it. Since I wasn’t sculpting it to be based off of a particular existing dragon, it gave me a lot of creative freedom!
Q27. It would be cool to hear what materials you use and how you handle them. :)
A27. In terms of clay, I tend to prefer a mix of ½ Super Sculpey Firm, ¼ Sculpey III Black, and ¼ Super Sculpey. Let me know if you have any other material questions after reading through the walkthrough, as I’d be more than happy to answer them!
Q28. For example what temperature the material works best within (if that's a thing). It looks great btw. I love the level of detail :3
A28. Baking instructions vary based on the clay you’re using. Sculpey recommends to bake at 275 °F (130 °C) for 15 minutes per 1/4 in (6 mm) thickness, but I baked Steinir for 175 °F for around four hours. I’ve generally found that I get less cracks if I back at a lower temperature from an extended period of time, but also if I leave the sculpture in the oven to cool overnight so that it slowly returns to room temperature. Keep in mind that you can also bake polymer clays multiple times if you do it carefully! For instance, I actually sculpted and baked the jaw of my Deathwing sculpture separately from the rest of the sculpture.
Q29. Are your anatomical choices based on any particular real life animals? Reptiles, mammals?
A29. I opted not to use any existing images of dragons as reference, and instead pulled-up high-resolution photos of komodo dragons, horses, crocodiles, alligators, iguanas, bongos, deer, kudu, and the occasional velociraptor, because, well, dinosaurs.
Q30. Is it important to know what the rest of the body is like, even though you sculpt a bust?
A30. I personally think it is. That doesn’t mean you need to take a lot of time figuring out all the intricacies of the parts you aren’t sculpting, but knowing how the rest of the body generally looks like will help determine what muscles attach where, and what sort of shapes you’d be seeing in the neck and shoulder area.
Q31. Do they have a story?
Q31. In this particular case: not really. If I was forced to place him amongst my story characters, though, I’d suspect he might fit into the Draconic part of my novel’s extended “world.” Those are some things I’d definite love to write about once again!
Q32. What part of the sculpting process is most difficult?
A32. I’m going to cheat and say two things, since they go hand-in hand: 1.) Trying to get a sculpture to look symmetrical, and 2.) trying to get that sculpture to read well under a variety of different angles.
Q33. What part takes the longest?
A33. For this particular sculpture, the detailing phase took the longest since I insisted on covering every last bit of this fella with some manner of scale or pattern.
Thanks again for all of your wonderful questions, and for reading my walkthrough! If you have any follow-up questions, don’t hesitate to let me know, and I hope you found this guide informative!
At last Monarch Brightwing was finally ready for her butterfly cosplayer! In the next blog covering this quirky project, you’ll witness everything coming together, butterfly and all, to complete this unique take on cosplay! You can check out some teaser images below.
As this project was done for work, all photos of Brightwing and my Brightwing sculpture are Copyright Blizzard Entertainment. All standalone monarch photos are copyright Kimberly LeCrone. * - As far as we know!