
Recap:


As such, I hope you enjoy this flashback onto an early project of mine. While it's not sculpture in a traditional sense, it's projects like this which ignited my imagination and fed my desire to learn and improve, and this project is incredibly close to my heart.
I tended to be even more verbose back in my LiveJournal days, so I've shortened and edited some of the original text below from LiveJournal. This is the third of four blogs about this project, and you can access all available parts at the links below. These are the original images I posted in 2006, so they're also a bit on the small and blurry side, but there will be some nicer ones in the final blog: promise. :)
Enjoy!
- Part 1 - Conception to Early Production
- Part 2 - Painting and Refining the Base
- Part 3 - Water, Terrain Details, and the Wizard's Abode
- [Coming Soon] Part 4 - Detailing the Wizard's Abode, Furniture, Props, and Final Details
Scale Model Project: "Wizard's Retreat": Part 3 of 4 - Painting and Refining the Base


It was amazing how much planning ,time, and money all this was taking, but I was certainly in a "spare no expense" mindset at the time, and I viewed this as a portfolio piece for once I graduated college.


Some of the landscape glue was also still wet at this point, which is why the glue appears white above rather than clear. I also worked on texturizing the riverbed at this point.
I actually did all sorts of weird stuff for realism down to some light green powder I blew on the right side of the riverbank there to be moss. :) I did something similar along the top of the rock faces, but unfortunately it doesn't appear as though I took any photos of it at the time, because it was starting to get down to the wire.
This is the future area where debris would have collected to form a sort of pool. I thought that would be something neat to have the bridge cross over it there. The final water level was supposed to be a little higher than where those logs cross. I even had to age and stain that wood so it looked like fallen logs. Regular sticks from outside don't cut it thanks to the scale issue.

This is a view looking down at the empty waterway, including a log that's precariously close to the crest of the waterfall. If you look carefully you can see the start of a deciduous tree on the lower left. You can also see where two smaller creeks converge before they reach the first waterfall.
I want to point out that each single rock had to be glued in place individually as this project would have to be driven all the way to my college for evaluation, so it had to be completely secure.

This was when I made a horrid discovery: the faux water I wanted to use was meant more as a coating than for depth as I intended to use it. I discovered that it was recommended for 1/8 of an inch deep every 24-36 hours, or else the layers below would never fully dry.
This created quite a problem because not only was the river intended to be a good 1 -1 1/2 inches deep in areas, but like a real river, it all ran DOWNHILL. So when the base was finally dry (and that included the glue from the plants), the liquid poured down the waterfalls rather than staying in place.
Also, at this point I believe there was only about a week of time left until the project was due, which made the water situation even more...problematic. I hadn't thought the water would be such a big issue, but as with everything: it was a learning experience I had to overcome. Therefore, at this point I halted progress on the actual treehouse to try and rush the base so that I could put in the artificial water once every 24 hours and pray I could get it sufficiently deep in time.
In the image above you can see two 1/8 inch layers of the liquid water. Which.... you might be able to guess wasn't very deep. It looked like there was a steady trickle, but not exactly something that would require two raging waterfalls.

There were are a few more layers of the artificial water shown above, and as you might be able to see: it's cloudy until it dries (and it wasn't drying completely within 24 hours, because I wasn't giving it enough time to dry because I was running out of time...).
At this point I also started on the walls of the tree house. As if I couldn't have made things ANY more difficult on myself, most of the walls were curved, so I couldn't use matte-board or something to make the walls properly, so instead I ended up building the walls stone-by-stone by hand.
That's right: every stone you see is individually placed. And trying to regulate the curves and the thickness and making it structurally sound? It was tremendously harder than it looks. If you see the tape along the front curve: that is actually where one of the cut away walls was going to be, so it could not be directly attached to the base. The intent was to make the wall removable so that I could pull the wall off if I wished to shoot into the interior of the finished miniature.
So I had to get the clearance as close as I could so it look like the wall was continuous, even though in reality it wasn't. I also had to make it look as if it was continuous by making the spots were it nearly connected hidden and concealed. I ended up offsetting the rocks along the edges sort of like the grooves on a key.
The "stones" are ballast as well, but I bought bags and bags of the stuff just TRYING to find suitable rocks for the walls. It took days and days of straight work just to get that much done because I was also having to wait on the glue to dry to keep things structurally sound as I went.


At this angle, you can see some of the lilypad flowers I made that were formed to appear open or closed.
And each of those flowers? They took me about an hour to craft each single one! I recall removing some of the other flowers temporarily so I could add more yellow pollen to the open ones to ensure I didn't accidentally get the powder in the still drying liquid water.

At this angle you can see the tape of the break away wall, and for the first time: stained glass windows! Those suckers had hand-cut moldings that were then painted and aged, and then I cut acetate to put in the "frames" which I then affixed and used a brand of glass marker and frosted glass paint to make it look like stained glass. Please keep in mind: I didn't have instructions of a guide for any of this: I had to figure out creative techniques for myself.
At this point I also realized I had to figure a way to make the windows sit IN the wall... which was a lot harder than it sounds. Especially to get them to sit "straight" when the rocks below them were all bumpy and un-fileable.
I went with a dark green and sort of burgundy color scheme. The little knight (which was: larger than a real person would stand), continued to serve as a temporary stand-in for scale purposes.

To the far right is the kitchen, and the far left is the edge of the Globe Room where the wizard can freely practice his spells. In the back is the door frame of the front door!


It really didn't' help that the walls were curved, either. curved walls + "straight" windows = recipe for frustration.
In the background the bathroom/bedroom and front door share another cut away wall. You can also see the water level of the river is slowly rising, little by little.

This is a rear shot with the rear cut away wall removed so you can see the progress/development. This is where I determined the idea of a second story was out of the question at the moment considering the current scope of the project and time remaining. I just remember thinking how the dry time of that medium was horrible.

Anyway: in the shot above the tree is upside down. That little opening on top is the nook where the cozy den would later be situated within.


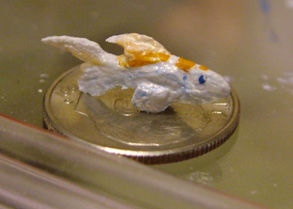
I was slowly running out of time on the water, so I had to call it "done," so it would (hopefully) turn a bit clearer before the time the project was due for grading. So at this point, I added handmade lilly pads that I painted with acrylic and sealed. I wasn't totally done with the flowers yet, but at least the dragon koi was definitely underwater.
I might have gone a bit overboard with the lily pads, but I regret nothing. ;)

At this point I also placed the continuation of the large tree trunk on top of the main structure so you could get a look at how it would go along when completed. It only has its first layer of paint on here, which is why it doesn't yet match the base of the trunk below it. I worked at this point to texture that as well as to hollow out the area where it is open in the den room in the middle. There is also a branch sticking out the side there to give an additional sense of scale.

Here is another view of all of those incomplete elements. Along the bottom right you can see where I was starting to plan out the stairs, which was another area where curves = very bad idea). Unbeknownst to myself, I made this project so very difficult on myself for art's sake.

Next I began using water effects to create and bulk up my waterfalls, as well as to add the sort of ripples in real moving water. At this point it was still wet, so it's not entirely clear but.... it was really neat to finally see! That log on the topmost waterfall appears to hold back some of the falling water.I like little unexpected things like that. :)

Though you can't see it: the final white and pink lily flowers were finally in place here as well.
Up on the edge of the Globe Room you can also see piece of furniture! A wardrobe of real wood that was individually put together and hand-cut/stained in a cherry stain. Many tweezers were involved. This wizard is rather well-off, so it figured to me he'd have such nice pieces of furniture. There are even tiny handles and a mirrored front! Pieces like that took so long to put together.
On top of the wardrobe is a potted fern, also handmade. I put little wires under the leaves so I could bend them how I wanted. (Sooooo tiny....) I had all array of magnifying glasses, tweezers, and pins for this stuff.
I realize this all seems so "quick" to post in comparison to how long it actually took, which is so many dozens of hours over weeks and months that I wouldn't even be able to keep count.
I hope folks are enjoying seeing this take shape. :) Apologies that I was a bit slim on photographing these later stages: I was too busy crafting it to even think to pick up my camera.
We're getting close! :) Stay tuned for the final blog, which is brand new and will be Part 4 of 4!
No comments:
Post a Comment